I am very happy for card makers to use my designs and Tutorials for there own personal use, I give permission to other teachers who have attended my classes to use my Tutorials. but would appreciate a credit to the design and instructions.

please get in touch if you would like more information.

Many thanks

Happy Crafting Yvonne xx

Tuesday, October 30, 2012

Pop-out Pocket


C5 Pop –out pocket card
Design and tutorial by Yvonne Tune Card Art Kilcoole


To Decorate the Main Cards
mat 4 x 13cm by 19cm patterned papers to 4 x 14cm by 20cm gold panels,
Stick a matted panel to the front, back and both inside panels,
ready for the Pop-out  pocket.
and decorate as you like
This is a great card to hold a gift voucher or money.


    To make the pop out pocket
      1. Cut a sheet of card 14cm by 30cm, score it on the A4 tri-fold line and the A4 Half fold line, rotate card and score it again on the A4 Tri-fold line, give all the scored lines a nice tight crease with a bone folder.

   2.  You now need to cut away a wavy edge from the card, and I have drawn this free-hand. Take a piece of card the same size as the  outside panel 10cm by 14cm, and draw a wavy line
                           

3. Cut the Wavy edge off. (This is now your Template)
                   

4.     Line the template up on the right hand panel of the card, and draw the wavy line, turn the template over, on the left hand side and repeat


     5 . Cut the tops off.


6. You now need to make the templates for the top layer of the pocket, so cut a second piece of card, 9cm by 13cm and place it behind the first template centrally,


           Draw the Wavy line out.


        Cut the top off


       You now have a equal boarder around each panel.


Thursday, October 11, 2012

Wine Bottle Gift Tag


Wine Bottle Gift Tag Tutorial


1.      Cut a Sheet of A4 Card length ways, 10 ½  cm by 30 cm,
2.      Score it on the crafters companion board, by rotating the board and scoring on the opposite side on the A4 half fold line.
3.      And score it again on the A4 gate fold line
4.      Using a corner punch or a fiskers corner scissors, cut the 4 corners off,
5.      I have used the smallest circle template cutter from my      X cut set of circle templates, and cut it on the inside to fit over the neck of the wine bottle, ( if you don’t have the x cut templates, use a lid off a spray can, draw around it and cut with a craft knife, this is quiet hard to do, so use a peel off to hide uneven edges)
6.      The long front panels now measures 18 ½ cm long by 10 ½ cm wide. You need to add a layer of gold card and a layer of printed paper, (I used tartan) Gold card 17 ½ cm by 9 ½ cm, cut corners off one end only. And the Tartan 16 ½ cm by 8 ½ cm. cut corners off one end. And stick layers to the green cards.
7.      I have used a large oval scalloped die cut, with a smaller crafts too scalloped die cut for the second layer, the main greeting has a lovely holly boarder found HERE, which I added the greeting to. I have layer the oval panels with foam tape.
8.      I used a Christmas rose pick and some pretty ribbon to add a flourish
9.      And I added a green Gold and Tartan band to hold the tag in place.
10.   Green 28 cm long by 4 ½ cm wide.  And scored on the 1st line of the crafters companion board, either end, I then cut a Strip of gold card, 21cm long by 4cm wide, and a Tartan strip 20cm long by 3 ½ cm wide, and stuck the 3 layers together, in between the scored lines, I used Hi-tac tape to attach the scored ends to the back of the front panel, behind the greeting. Which you can not see in the picture,

Friday, July 27, 2012

Crepe Paper Flower

You don't need a fancy die cutters to make these pretty flowers.
I have punched a 2 and a 1/2  inch circle and a 2 inch 
circle punch for my templates
I Folded over the crepe paper 7 times for each size petal 
placed the circle on top and cut around the circle.


Screw each petal layer up into a ball.


Open them out roughly 
and layer them up in the opposite direction, by that I mean each petal layer with naturally curl up wards when you open the ball, so start placing them on top of each other in the opposite direction. all the large petal layers and then the smaller ones.

Use a pricking tool to make a hole in the centre for a brad to secure all the petal layers in place, 
squeeze all the petals again and tease  out to form your flower.
Or stitch them in place and add a button. or a blob of silicone and some seed beads to look like stamens .

Here they are complete.
Use different size circles to get larger or smaller flowers
these take about 5 minutes to make.

Crepe paper cost about €1.00 a pack 
and each pack makes about 50 flowers 
so very cheap to make
but very effective.


Friday, July 13, 2012

Box Easel Gate Fold Wedding Card.


Front View when card is closed   
           
Inside view before easel is opened


Inside View when Easel is propped open        


     Box Easel Gate Fold Wedding Card.
     Design and instructions for this card by 
     Yvonne Tune Card Art.
This Card is a new fold for me, something totally different, I added the box sides to allow the card to close neatly so you didn’t know there was decoupage inside, it has a surprize element as the easel drops down to reveal the easel
1.    Cut a sheet of A4 card 15cm by 30cm and score it on the A4 gate fold line, twice. Score it again, by placing the scored lines against the butt bar of the lid side of the box side of your crafters companion board, this small fold is to allow the decoupage to sit inside the card without getting Squashed. You need to this both sides.
    2. You now need to extend the gate folds so stick the 2 x 7cm by 15 cm panels either side of the gate fold, inside and outside for a neat finish. repeat this for both gates.
     3. Cut a sheet of A4 card 15cm by 21cm, and score A4 half fold line, give the scored line a nice tight crease with a bone folder, Score it again, by placing the scored line against the butt bar of the lid side of the box side of your crafters companion board, and score it on the first line. this small fold is to allow the decoupage to sit inside the card without getting Squashed.
   4.   Attach the smallest panel to the inside of the gate fold, at the bottom. To form the card floor.
   5.   The Scenery for the inside should be one picture cut into 3 panels, printed on the landscape, 28½cm by 15cm.
   6.   Cut your scenery outside panels 7cm wide, allowing you a middle panel 14 ½ cm by 15cm stick all 3 panels inside the card, stick a peel off down each box seam.
  7. Stick the 14 ½ cm Sq gold panel to the floor of your card, and mat the 14cm printed background to the gold.
  8. Cut a 8cm by 21cm panel and score it on the A5 concertina fold line and again on the A5 half fold line.
give the scored lines a nice tight crease with a bone folder, to form your easel, And attach it to the base of your card centrally,
  9. Mat and layer the gold and printed greeting to form the easel rest, stick this in front of the easel card to prop the easel open, it will need a double height of foam tape to make it high enough to keep the easel open.
  10. Mat and layer your cream and gold panels. Stick 2 strips of double sided tape to the bottom of the back of the gold card, and stick it to the easel
  11. Cut out your decoupage sheet and stick the main image to the cream and gold panels, Build up the decoupage layers.
  12.   Cut 2 gold panels 6 ½ cm by 14 ½ cm for the front gates,
  13. Cut 2 printed panels 6 cm by 14 cm and mat to the gold panels on the front gates,
  14. Mat and payer the punched scalloped oval Bride and groom on to the gold punched oval panels, and raise on foam pads and stick these either side of the gates,
  15. Stick the bows underneath each image, and finish off with the resin roses

      To make a box for this card

      which is 15cm Sq box card
1.      Cut a Sheet of card 21cm Square and score it on the 1st line of the crafters companion board
2.      Cut the 2nd sheet slightly smaller by about 2mm so the measurement will be 20.8cm Square, and score it on the 1st line of the crafters companion board, The box side of the board is to low in height on the 1st line and too small in size on the 2nd line, So this box is scored on the card making side of the board to fit the box just right for this card..
3.      Cut into each cross over scored line, and snip a tiny bit away
Give all scored lines a nice tight crease with a bone folder. and fold and stick the corners


4.     Repeat for the lid,  Decorate the box to match the card. 


Thursday, July 12, 2012

Gate-Fold Step Card

View of Card closed
You slip the gate-folds between the middle step to close this card neatly


1.    Cut a sheet of A4 card 15cm by 30cm and score it on the A4 gate fold line, twice.

2.   Cut a sheet of A4 card 15cm by 21cm, and score on the base side of a crafters companion board on the box side. On the 2nd line, 4th line, 7th line and 10 line, give all score lines a nice tight crease with a bone folder, starting with a mountain fold and the valley fold and so on. This forms the steps to go inside your card.

3.   Attach the last panel to the inside of the gate fold, at the bottom. Working up to biggest mountain fold, with the smaller mountain fold at the front.

4.   The Scenery for the inside should be one picture cut into 3 panels, printed on the landscape, 28 ½ cm by 15 cm.

5.   Cut your scenery outside panels 7cm wide, allowing you a middle panel 14 ½ cm by 15cm stick all 3 panels inside the card,

6.   Decorate the steps, I used lace to compliment the ladies dress, in the image. And a happy birthday greeting matted onto blue card to cover the front step.

7.   Cut 2 panels 7cm by 14 ½ cm for the front gates, and add whatever decoration you want, I choose a shell border for this card,

8.   Lastly add your main image, decoupage the image if you wish, to the front step.

9.   If you find the image to heavy for the front step, stick the back step with doubleside to the scenery.


10. Decorate the back of the card to match.
I wrote a little poem to go with the image, so picked out the sand castle mentioned in the poem for the back of the card. and added some card candy.


View of card opened


View of the back of card

 As I gaze out to sea
Childhood memories
come flooding back to me
Of days well spent on the beach.
Building sand castles
Swimming in the sea
And a picnic lunch
Mum prepared for me.
Fun and laughter
Games galore
An ice cream cone on the way home.
With sand in my toe
And the wind in my hair
Gazing at the sea
Memories come flooding back to me.

Tutorial by Yvonne Tune Card Art Kilcoole


Wednesday, June 13, 2012

Table Top Easel Card

Father's Day
Table Top Easel Card

To make this fold
1.      Take a 21cm by 15cm piece of card, matt a 20cm by 14cm, of contrasting card on top.
2.      Cut a Piece of card the same colour as the base 9 ½ cm by 21cm score it on the A5 gate fold and on the A5 half fold lines on a crafters companion board. Give all scored lines a nice tight crease.
3.      To make the front card, (to stick on the easel), cut a piece of card 9 ½ cm by 30cm, and score it on the A4 half hold line, fold and give a nice tight crease, when folded in half, trim 3 ½ cm off the end, to make the folded card 11 ½ cm long by 9 1/2cm wide. Stick this to the last panel on the easel fold, putting the double side tape on the last panel of easel fold.


Card Front
Card Base

4.      Cut a piece of contrasting card to match 9cm by 9  ½  cm and stick it to the floor of the easel
5.      Cut a piece of contrasting card to match 9cm by 11cm and stick it to the front card on the easel
6.      To make an insert for this card,  the measurements should be 9cm by 19cm folded in half, add some punched details to the corners, and stick inside the main easel card.
7.      Your main image for the easel card should be 8 ½ cm by 10 ½ cm. decoupage if desired.
8.      Matt and layer a greeting in contrasting card and stick in place to hold easel card opened, raise it on a double layer of foam pads to be high enough.
9. Add some detail with an embellishment.
The poem or greeting either side of the card, can be no bigger than 5cm wide, add some detail with peel-off boarders and corners.
I used a lovely light house poem for this card, it took a while to size it to fit.
10. This card folds flat when closed and fits a c5 size envelope.


Monday, June 11, 2012

Cutaway Concertina Gatefold card


Instructions for Anniversary Waltz 
Cut Away Concertina Gate Fold Card
Design and instructions by Yvonne Tune Card Art Kilcoole
Vintage images from ETSY were a download
Background is a printed sheet from Crafts u print
Lace Bluebellgirlcrafts.co.uk 
heart embellishment, totallybeads.co.uk

Front view

   Inside View 
 
1.   Score 2 cards on the A4 half fold and again on the A4 gate fold line, each each scored line a nice tight crease with a bone folder.
2.   You now need to cut the top sides away, Draw a mark at 9cm on the outside edge of the right panel. Line up your ruler at the top left side of the panel, just inside the scored line, and drag the ruler down to the mark. draw a pencil line diagonally. And cut the piece away, either with a craft knife of your paper trimmer,
3.   Repeat the steps on the opposite side.
4.   Attach the 2 card together by sticking the 15cm by 21cm panels together. Cut out the Music sheet, I have cut this free hand in a wavy edge style, matted it to the gold panel and re-cut the design allowing a 4mm boarder. Stick this to the middle panel inside the card.
5.   Mat and layer each of the images onto the soft pink and gold card, allowing a 1/2cm boarder. Stick the first image flat, the second image has a lace band across it, secured at the back, add a small piece of the paper doily behind, and stick this overlaying the first image, the dancing couple has some ribbon detail over the image, secured at the back, and a tiny bow added, use the rest of the paper doily, to add some detail to the panels. 


6.   Stick the greeting panels to the card inside, to the 2 middle panels, and trim excess away.
7.   The front panels, need to be measured, Place the gold panel 7cm wide by 21cm on to the card, and drag it slightly upwards, and mark where you need to cut away with a pencil.  Place the cream backing paper on top and repeat the instructions, this will give you a 1cm boarder, fitting the design perfectly, repeat this for all four panels. Stick the inside back panels flat to the gatefolds
8.   Before sticking the front 2 panels, you need to attach the lace bands, try to line up the lace so it looks like it’s flowing diagonally across the card. and secure the lace at the back, and stick to the 2 front panels with Hi-tac tape.
9.  Cut the greeting as small as you can and mat and layer on to the pale pink card then gold allowing a 1/2 cm boarder, and stick it to the left hand panel towards the top.
10.      Thread the little heart on a ribbon loop, about 12inches long thread a pearl on to each of the ribbon tails. you will need to do a double know to secure the pearls, fold in half so that the pearls hangs down, and stick to the lace with hot glue, make a vintage bow, ( you will find a tutorial HERE) and stick it on top of the ribbon, to secure it in place. 
11. Stick the 2 punched hearts overlapping on to the left front panel towards the top.

C5 Peach Lace Wedding Easel Card


C5 Peach Lace Wedding Easel Card
Design and instructions by Yvonne Tune Card Art Kilcoole 
Background for this card is a buy now printed sheet from craft-u-print
Flowers from Mulberry Crafts Uk
Lace from Blue Bell Girls Crafts Uk
gold rings from Create-n-Celebrate.co.uk
Ek Success punch
Die-cuts from cricut.

This Easel card has A C5 card attached to add a insert inside.
 Front view      

         
     Side view

1.   Score an A4 sheet on the A4 half fold line, and again on the gate fold line. give both scored lines a nice tight crease, with a bone folder
2.   Score the 2nd sheet on the A4 half fold line, Attach the C5 card to the last fold on the 1st card to form an easel.
3.   Trim insert about 3mm on the side and either top or bottom, Add some punched detail, to the corners. Stick your insert inside the C5 card,
4.   To Decorate the Floor of the Easel card, Stick the 13cm by 19cm printed background to the 14cm by 20cm gold card, the lace detail should be pointing downwards, and stick the panel to the floor of the card centrally.
5.   Add the pearls to the pearls on the image, 
6.   Punch a boarder out on a 5cm by 21cm gold panel,
7.   Cut 2 strips of cream card 21cm long, and depending on the width of the punched panel after it has been punched, cut the cream panels to fit.
8.   Take one of the cream strips, and wrap the peach ribbon across the strip and secure at the back.

9.   Thread the narrow cream ribbon, through the wedding rings embellishment, and place it over the peach ribbon, securing the rings in place with hot glue, secure the ribbons behind the strip and sandwich the 2 Cream strips together to hide the ribbon ends, stick this on top of the punched gold strip of card, and double raise it on foam tape, and stick to the floor of your card, just above the pearl details on the paper.

10.                  To Decorate the main card .  Stick the 13cm by 19cm printed background to the 14cm by 20cm gold card, Wrap the Lace around the middle of the panel, and secure it at the back. Overlay the peach ribbon and secure at the back, and overlay the narrow cream ribbon, and secure at the back, make sure you use plenty of tape to stick the panel to the front of the main card, (Hi Tac Tape would be best)

11.                  Slip the die-cut boarders on to the first Die-cut greeting layer, and secure at the back, add a little glue to the pieces that over hang the front to secure them,
12.                  Mat and layer the die-cut greeting panel and add the wedding peel-off, raise this on foam pads. And stick it over the lace and peach ribbon towards the top of your card on the left hand side.
13.                  Make the vintage bow, follow my instructions today  (there is a picture tutorial on my blog). HERE 
14.                  Stick the bow on the ribbon to the right side of your card.
15.                  Arrange the flowers and leaves on the bow and to the top of greeting.

Tuesday, May 15, 2012

Paper Scraps


At the end of a busy day card making
I often have small pieces of scrap backing papers left over,
these generally go into a scrap box and are given away to friends
 who teach children's craft classes.
Backing papers are so expensive, that sometime 
if I am not to tired at the end of the day., 
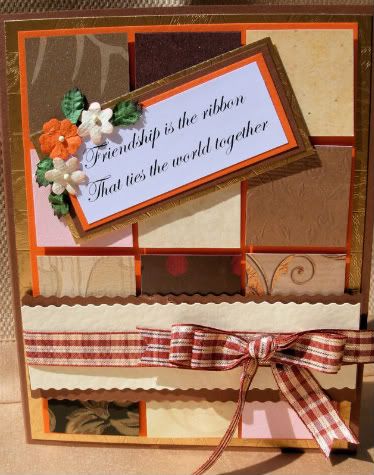
I put them to use, joining scraps to make multi backgrounds in strips or quilt effect.
Quilted backgrounds are big just know, so take some time and create your own. by cutting 4cm sq pieces, 3 across and 4 down, backed onto a contrasting card, 13cm by 17cm, and then on to silver or gold card 14cm by 18cm, you can trim the main card, to 30cm by 19cm, score it on the A4 half fold line, and mat and layer  for a neat finish.

For an 8 by 8 inch card
Cut 4cm sq pieces, 4 across and 4 down, backed onto a contrasting card, 17cm by 17cm, next layer 18cm by 18cm and then on to silver or gold card 19cm by 19cm.
Which fits neatly on an 8 inch Square card.
add a extra finish by using a pinking shears to cut the Squares, and adding faux stitching with a pro marker in a toning colour.


Photobucket


Sunday, May 6, 2012

C5 Triple Easel Card Tutorial


C5 Triple Easel card
Design and instructions by Yvonne Tune Card Art Kilcoole 
This design has only one rest as the middle easel acts as a rest for the last easel card.


Front view   
 Side View


1.   Back Easel. Cut a Sheet of Cream card 30cm by 14cm and score it at 21cm, giving you a 21cm by 14cm panel and a 9cm by 14cm panel
2.   Stick a Blue 20cm by 13cm piece of card to the floor of the main easel card, stick the printed background 12cm by 19cm centrally to the blue
3.   Score a Cream A5 sheet of cream card on the A5 half fold, Stick the 9cm panel  from the main card to the inside back of the C6 card on the landscape, to form the back easel, (This is where you can add your own personalised insert)
4.   Cut a Cream 14cm by 16 cm, and matt a Blue 13cm by 15cm panel to it, cut out your largest image and stick it centrally to the blue panel, stick this to the back easel card.
5.   Cut a blue panel 9 ½ cm by 13cm and stick the printed background 8 ½ cm by 12cm centrally to it, stick this panel at the back of the first easel,
    So that the card looks finished when closed
    This is where you can stick your own personal greeting.

6.   Middle Easel. Cut a Cream panel 13cm by 20cm and score it at 5cm,10cm, giving you 2 x 13cm by 5cm panels and a 13cm by 10cm panel, Give all scored lines a nice tight crease and stick the 10cm panel to the floor of  the main card, (about 2 ½ cm from the edge)

7.   Cut a cream panel 11cm by 13cm, and stick it, to the blue 10cm by 12cm card cream, and stick the matted layers centrally to the middle easel. Cut out and stick the second image to the middle easel.
8.   Cut a blue panel 12cm by 9cm and stick to the floor of the middle easel, cut a printed background paper 11cm by 8cm, and stick centrally to the blue floor panel.


9.   Front Easel. Cut a cream card 9cm by 12cm, and score it at 3cm, and 6cm, this will give you 2 x panels 3cm by 9cm, and the floor panel 6cm by 9cm, Give all scored lines a nice tight crease, stick the 9cm by 6cm last panel to the floor of the easel.
10.                  Stick a blue 6 ½ cm by 7 ½ cm to the cream panel 7cm by 8cm, and stick centrally to the front easel.
11.                  Cut out the greeting 6 cm  by 6 ½ cm and stick it to the front easel centrally,
12.                  Cut a blue panel 7 ½ cm by 5 cm and stick a printed background panel  7cm by 4 ½ cm to it, and stick to the floor of the front easel
13.                  Stick the scalloped blue oval to the cream oval with foam tape, and build up the Easel Rest with a double layer of foam tape, stick this in front of the front easel as the rest.
14.                  Decorate the rest of the front easel with the hydrangea petals and little blue flowers,